


Self-Closing Gate Kit
Product ID: 5722951
Details
- BrandLife Saver
- ColorBlack
- Item Weight23 pounds
- MaterialAluminum
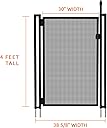
- Product Dimensions48"W x 48"H
🔒magnetic self-latch
🛠️DIY easy install
🛡️4ft safety height
Desertcart purchases this item on your behalf and handles shipping, customs, and support to Samoa.
🔐 Secure your pool, secure your peace of mind.
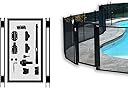
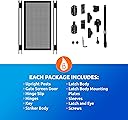
The Life Saver Pool Fence DIY Self-Closing Gate Kit is a robust, 4-foot tall aluminum safety gate featuring a magnetic self-latch and self-closing hinges. Designed for easy DIY installation with included hardware, it uses industrial-strength, UV-resistant mesh rated for 387 PSI to ensure long-lasting durability. Backed by a limited lifetime warranty and expert support, this gate is a trusted solution to keep children safe around pools while enhancing your backyard’s security.
| ASIN | B00DM6KI6K |
| Age Range Description | Kid |
| Best Sellers Rank | #58,901 in Patio, Lawn & Garden ( See Top 100 in Patio, Lawn & Garden ) #781 in Pool & Spa Replacement Parts |
| Brand | Life Saver Pool Fence |
| Brand Name | Life Saver Pool Fence |
| Closure Type | Magnetic |
| Color | Black |
| Customer Reviews | 4.2 out of 5 stars 794 Reviews |
| Global Trade Identification Number | 00741360782167 |
| Item Dimensions W x H | 48"W x 48"H |
| Item Type Name | Removable Mesh Safety Fence for Pools |
| Item Weight | 23 pounds |
| Manufacturer | Life Saver Pool Fence Systems, Inc. |
| Manufacturer Part Number | GATE48-DIY |
| Material | Aluminum |
| Material Type | Aluminum |
| Model Number | GATE48-DIY |
| Mounting Type | Hardware Mount |
| Product Dimensions | 48"W x 48"H |
| Target Species | Kid |
| UPC | 741360782167 |
S**G
Excellent Gate for my Pool Area
TL;DR: This is an excellent gate and makes access to your pool really convenient. Installation is not trivial. If you're not handy, have a professional install it for you. Always make sure the self closing part of the gate is tight and assure that the gate closes. When we purchased our house, the safety fencing that was already installed was in great shape, but very hard to open because you had to pull a single section out of the ground every time you wanted to pass through it. It was so tightly fitting that my wife couldn't really open it without help. And when it was already open, you had to leave it open to get back through it again on your way back, which meant that for that time, our toddler had access to the pool. None of this was ideal. We needed a gate. After doing a lot of research I found this one and bit the bullet and ordered it. The price seemed high, but it is honestly a very well constructed and quality product, and I was pretty happy when it arrived. However, installation should be done by someone handy and with the tools to drill into the pool deck or flooring where your gate is. I'm pretty handy, but I called over my dad, who's very comfortable with this kind of thing, and we tackled it together. We had to cut off a section of the existing fencing in the middle where we wanted the gate installed. I drilled holes for this gate's 'posts' into our pavers. We attached those posts as instructed to the existing fencing and then put the rest of it together. The instructions are pretty good, but can be a bit confusing at parts, and the quality of the parts are excellent. One year later and this gate is still functioning great. The self latching parts of the gate will need adjustment from time to time, so keep a flat head handy to tighten it over the first month or two. There's two hinges with springs that need to be turned to adjust how quickly you want it to pull itself closed. I turned those suckers up pretty high so they would close quickly behind us and not accidentally close too softly to latch shut. I would love to find an outdoor chime that 'dings' whenever the door is opened, but haven't found one yet. IMPORTANT / SERIOUS NOTE... The most important thing for anyone installing a gate is making sure that it's full proof, and doesn't fail to latch. It needs to ALWAYS latch behind you, and you need to be sure of it closing every time. A few years back we had very good friends who lost their 2 year old son to a pool drowning. They were good people who were never neglectful of their child and kept a very close watch on him. They were proof that tragedies like this can happen to anyone. They turned their back for a few seconds and that's all it took. Please, make sure you install this gate and fencing properly and securely, and always make sure the gate latches behind you securely. UPDATE: 2 years later and this thing is still working perfectly. Couldn't be happier with it.
J**Y
Can be used with wooden railings!
We purchased this gate because we have a 2 teared deck /swimming pool that is directly connected to our house We have a very curious 4 year old son who loves water. I refused to open our pool up this year until I had a safe enough gate that would keep him from getting down to the bottom deck/pool area. I found this gate and was worried it wouldn't be able to be attached to my existing wooden railing since it seemed that this gate was for the fencing system that looks identical to the gate.) I had our contractor add on an additional area at the bottom steps (the newer looking wood is the newer area he added on, in order for the gate to be as secure as possible. The only thing I'm aware of that he added was the 4 silver clip things on each side of the black posts. He said he added them because he said without them the posts didn't seem that secure. It wasn't like the gate or post was extremely wobbly, I guess considering how important the safety of this gate needed to be he felt much more comfortable adding on an extra security measure for it. The best thing I love about this gate is that it's self closing and locks shut. You can change the strength or weakness of the closure by turning the 2 plastic bolt type things inside of the corners of the gate, very simple to do. The gate also comes with the lock that is high and hard for kids to reach to open the gate. The lock also has a key that you can use to lock the gate so that you have to use the key to physically open the gate. The side you can't see is where the key hole is. It also has a light that turns green for unlocked , red for locked. My only complaint about this gate is that I couldn't find it in the color white since my railings are white. Other then that if your looking for peace of mind you need this gate. It's a little pricey but there's a reason for it. You absolutely cannot put a price tag on safety when it has to do with swimming pools and children. I wouldn't recommend leaving your child unattended because of it obviously,but you will feel so much better knowing you have a pretty good deterrent near your pool. I'm so happy with this purchase it's exactly what I wanted.
M**E
Easy to install when you follow directions
This was the best for self install. The guy that put the video on the website for instructions said it really well. It takes a little to follow the instructions as they are a little - not really confusing, but different. After that it is an easy install. Get a good hammer- drill and a good bit and it will go well for you. I got the drill guide as well And I think it helped pretty good. Super easy to install and take down. The gate is a little tricky but just follow the supplied directions. Some of it takes some Common sense.
A**R
Great fence but gate is tough to install
I bought the DIY pool fence and gate. It works great, but the insulation has been tricky. Everything went together nicely except for the gate. I even triple-checked with the company about what angles all of the holes needed to be drilled and it still is not lining up perfectly, so the gate doesn't close smoothly. My specific fence layout may be the cause of this, so others might not have the same issue.
M**B
We did not receive what is pictured. Buyer beware!
We purchased the gate kit that is pictured for our pool in New York and have been satisfied with it for a couple years. We decided to buy another for our parent's pool in Florida. Unfortunately, we thought we were purchasing the same gate kit that is pictured but that is not what we received. The model we received is completely different. It has been a nightmare to install and the magnetic latch is absolutely terrible. Nowhere near the quality of the original model. The instructions we received were for the previous model not the new model and did not match with the product we received (which is probably why we had so much difficulty installing it). When we contacted the company about missing parts we were told to email our concerns. We have yet to hear back and have since returned home to New York. Now our parents have a non-functioning gate and we are out $235. We are extremely disappointed in this purchase. We are unable to return product as we had a limited time visiting our family in Florida and trying to install this product. By the time we realized what a piece of junk it was our trip was over. No way our parents can take it apart and re-box it to ship it back and we don't return to Florida until next year! Not satisfied. False advertising. Non-existent customer service.
A**E
Worth the money, such a great gate!
We did the DYI fence and gate and installed this ourselves. We attempted to purchase a knockoff brand and it was garbage... we shelled out for the brand name gate and could not be happier! We have a toddler and the peace of mind this gate gives us is worth the price! The install was very easy following the template provided and detailed instructions with pictures and descriptions. The gate is self closing AND self latching. You need to be "adult height" to reach the mechanism to open the gate. The gate also has a key to lock the gate shut if you're not home or your tiny human eventually gets bigger. This is an investment and we are SO HAPPY WITH IT and the peace of mind and safety it offers.
X**D
We will see.... **Update : Very solid well built, smooth gate but may need some help.
I haven't completed the install of this yet but, that is due to an issue I am having with what I suspect is the posts not being able to handle the tension of the fence. Despite following the instructions once the posts are attached to the fence the tension pulls the posts 1-2 inches past vertical which also makes me wonder just how strong they really are. Now to be fair I have added this in line with a fence that uses the premium 1" poles and because they are thicker and stronger at the base they are likely putting more tension on the gate mounting posts then intended. My main gripe is that there is virtual no room for adjustment within the mounting of the hinges. Since this is a DIY kit one might expect that every install these gates see would likely be a little different and the gate should be able to adjust to that. That doesn't appear to be the case here. So I am going to have to come up with my own solution on how to either increase the adjust-ability of the gate or how to figure out how to reinforce the posts to keep them vertical. I will update when I get there. **Update** So I completed the install after fabricating two removable support bars (1 per side) to counter the outward tension from the fence. This allowed me to make the posts perfectly vertical (at least in regards to the left and right pull from the fence, there is a slight forward lean now as the supports are on the inside of the fence and there is nothing to balance the torque they are applying to the posts) see attached pictures. So back to the review, the build quality and craftsmanship of the gate are excellent, I do believe that it will hold up well and last for many years to come. The gate opens and closes very smoothly, latching every time. Compared to reviews of other gates I do still feel this is probably one of the best on the market so why am I giving it a 3 (I upgraded from a 2), in two words, "The Instructions." They are lousy, now maybe I was just in the heat and sun too long and completely lost my patience but, considering that I am an Engineer that reads and writes specifications and technical documents for systems that costs tens of millions of dollars on a daily basis I feel that I have a pretty good grasp being able to read and understand a technical document. These however, I threw out. You get one set of instructions for the gate, one set for the hinges and one set for the latch mechanism and there is not any flow from one to the next. The gate instructions are written as if the hinges and latch are already installed with the exception of one line that states follow instructions included with hinge/latch assembly (or something to that effect). My issue, now understandably I am a perfectionist and I want everything to be perfect and most importantly SECURE as the intent is to provide an additional layer of protection for the little ones. So if there is a Best Practice for installing the hardware on the gate I want to know what that is. This is not included in the instructions, the hardware instructions are very generic and are not tailored to the gate at all. For instance, in the gate instructions, the latch is pictured mounted very high with the two mounting brackets for the Magna Latch (post-side) mechanism very close together vertically. This is in contrast to what the latch manufacturer instructions recommend. Magna latch clearly states placing the latch mounts as far apart as possible but LifeSaver shows everything close and up high which has a second flaw, the higher the gate latch the larger the gap becomes at the bottom if the gate is pulled outward from the bottom. Lastly, the gate trim that holds the mesh in place is not segmented to allow proper fitment of the gate side latch device unless it is mounted at the very top, even higher than what the instructions show (so high I am not sure it is even possible). This means you either have to cut the trim yourself or mount it over the trim which didn't seem possible to me due to the spacing and instability of the gate side latch device not sitting on a flat surface. Maybe some of this was addressed in the instructions and I just never got there because I tossed them out but I looked through everything and never found any of this mentioned. Overall with a little modification the gate is rock solid and works well, with the added supports I placed on it, the thing feels like it could take a whole team of youngsters running into it without an issue. Now after tearing out a ton of trees, installing a new fence, and taking way too long long to installing this gate maybe I can focus on cleaning my now filthy pool and deck. End of Review, if you have similar issues or care to know what I did to correct the tension issue read on otherwise you should probably stop before you bore yourself. To install the latch I I mounted the latch on the outside on the two sliding brackets (placed as far apart as possible while still allowing a small amount of adjustment in height if needed) so that the top of the latch body (not the pull knob) was about 3-4 inches above the post top, this put the center of the latch mechanism approx 13 inches down from the top of the post, which is about 11 inches down from the top of the gate (gate and post tops are at different heights). I mounted my gate about 3/4" off the ground which was enough to provide adequate ground clearance even when fully open. In order to install the gate-side latch I marked out the position on the trim, removed the trim screws above that point and a couple below that point, slid a piece of wood behind it and cut it with a cutoff wheel. Then I reinstalled the screws to secure the lower portion back to the gate, installed the gate-side latch with 4 screws and attached the piece of trim that I just removed, installing it just above the latch. At this position the bottom of the gate can only be pulled out approx 1-1.5 inches with any reasonable amount of force that a 3-4 year old could apply. To support the posts I bought (2) - 6'L 3/4" x 3/4" aluminum square tube, a few feet of 16 gauge (approx .05 inches thick) 1-1/2" x 1-1/2" angle aluminum, (2) - 1/4" x 7" turnbuckles with eyes at both ends not hooks, (2) 3/8" x 2" SS bolts and some associated wing nuts, washers, as well as nylon spacers, a package of #10 SS pan head machine screws and associated washers and nuts. You will first need to look at the pictures to understand anything that follows as this isn't very detailed just a quick rundown for someone who is handy and was looking for some ideas. First I fashioned a plate to slide under the deck sleeve, each plate is a 6" long piece of angle alum and will sit on the deck with the vertical side on the inside of the fence. Each plate will be a mirror of each other as one goes to the left side and one to the right. For ease of handling I made as many of cuts in it first before cutting the 6" piece from the remainder of the stock. I started by cutting a 1-1/8" hole approx 1.5" from the end of the angle aluminum, using a cutoff wheel, then I extended the hole thru the end to make it a slot that would slide under the deck sleeve. I could have also just left it as a hole but then would have to install deck sleeve through the hole in order to install it on the post. This would also be a good option if you had the 5/8" deck sleeves. Then I cut a notch in the vertical side of the angle alum so that later I could bend the non-notched end up at approx 50 degrees where I attached the 3/4" alum tube. Then I trimmed the horizontal side of the alum behind the behind the hole so that it would not interfere with mesh fence. Then removed all burs and sharp edges. I then bent the non-notched end up at 50 degrees and installed the 3/4" tube such that the bottom of the tube just touches the deck, drilled holes and installed #10 screws, washers, nuts. Then I installed the mounting bolt for the turnbuckle, this was approx 1.25" down from the top of the gate post mounting plate and 2" in from the side. I drilled a 3/8" hole, installed the bolt with washer through the front, installed a black nylon spacer (its black so very hard to see in the pic) on the back, another washer and a nut, then tightened it all down. Then I installed one end of the turnbuckle on the 3/8" bolt with a spacer ( so that the alum tube doesn't touch the fence posts) and secured it with the wing nut. The I sized the alum tube so that I would have approx. 1" of the turnbuckle body exposed from the tube so I could actually adjust it (pay attention here to how the turnbuckle is set and how much variability you need so that you don't short yourself), then I lined up the point where the other end of the turnbuckle eye would be inside the tube. I cut the tube and drilled a 1/4" hole at a slight angle (the eye of the turnbuckle only fits in the tube diagonally so the bolt must be slightly angled to pass through the eye), for the bolt to hold the turnbuckle, installed turnbuckle, bolt, washers and nut. I then installed the entire thing on the gate and fence post, adjusted the turnbuckle to align the post vertically and repeated on the other side. The whole thing cost me about 60 bucks, in the near future I will remove clean, prime and paint it black to match the fence.
M**E
Easy enough gate for the pool fence
This is very easy to install, and the fence is good and sturdy. I bought 10 sections of fence (as well as the gate) and from first getting the product out the box to having the gate leveled and adjusted took about 8 hours. That included the time to actually read the instructions and plan out the fence route. The drilling base is essential, and also sturdy. The bullseye system and leveling bolts work fine, there are two bushings in it so the drill bit rotates freely, and you need to put some angle on the fence posts, depending on the shape of your pool. If you have a square pool, then you could get by without the base, but if you have some curved shape to your pool, then you set the posts at a slight tilt in order to get the right tension on the posts. I would not want to try doing that drilling without the guide. You need an 18" bit in order to get deep enough into the pool deck with the drilling guide. The gate was probably the most complicated bit of the installation, but still easy enough to do. Even with buying a Bosch rotary drill specifically for this job, 18" long 5/8" drill bit and the guide base I paid about a quarter of what I got quoted for this job.
Trustpilot
1 month ago
2 months ago