Buy anything from 5,000+ international stores. One checkout price. No surprise fees. Join 2M+ shoppers on Desertcart.
Desertcart purchases this item on your behalf and handles shipping, customs, and support to Samoa.
🖨️ Don’t let clogged nozzles kill your workflow—clean smarter, print sharper!
This 150ml Printhead Hospital cleaning kit is expertly formulated to unblock and restore Epson Stylus, Workforce, and Ecotank inkjet printers. Its alcohol-free solution dissolves dried ink within 30 minutes, compatible with multiple ink types including dye and pigment. Designed for up to 75 cleaning cycles, it’s ideal for maintaining print quality and prepping printers for CISS installation. Backed by UK-based customer support and comprehensive guides, it’s the go-to fix for professionals aiming to avoid costly replacements and downtime.


| ASIN | B004VMWTSO |
| Additional Printer Functions | Print Only |
| Best Sellers Rank | 21,073 in Computers & Accessories ( See Top 100 in Computers & Accessories ) 1,724 in Inkjet Printer Ink Cartridges |
| Brand | Printhead Hospital |
| Brand Name | Printhead Hospital |
| Cartridge Type | Compatible |
| Colour | Multicolor |
| Compatibility Options | Compatible |
| Compatible Devices | Printer |
| Compatible Printer Models | Epson Artisan 835 |
| Compatible devices | Printer |
| Customer Reviews | 4.2 out of 5 stars 6,330 Reviews |
| Ink Base | Water |
| Ink Colour | black, cyan, magenta, yellow |
| Ink colour | black, cyan, magenta, yellow |
| Item Weight | 210 Grams |
| Manufacturer | Printhead Hospital |
| Manufacturer Part Number | PHHEPS |
| Model Name | FBA_PHHEPS |
| Model Number | PHHEPS |
| Model Series | Epson Inkjet Printers |
| Model name | FBA_PHHEPS |
| Number of Items | 1 |
| Number of Trays | 1 |
| Other Special Features of the Product | Enhanced Ink Dissolving Speed |
| Page Yield | 75 |
| Page yield | 75 |
| Printer Model Compatibility | Epson ET(EcoTank) ET-2550, Epson ET(EcoTank) Expression ET-2550, HP Latex |
| Printer Output Type | multiple colors |
| Printer Type | Inkjet |
| Special feature | Enhanced Ink Dissolving Speed |
| Specific Uses For Product | cleaning blocked Epson inkjet printers, improving print quality, preparing for CISS installation |
| Unit Count | 150.0 millilitre |
C**W
Saved Our Printer
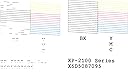
Our Epson Stylus SX510W suddenly stopped printing anything black, and generally we only print stuff in black, so that was a problem. Tried all the Troubleshooting stuff, ran various Head Cleans, changed all the cartridges, even changed the black 3 times (may have been lucky, wasn't....), and also the ultimate fix-all method of turning it off and on again a few times. Nothing worked. Then I stumbled on the video tutorial for this product on YouTube, and from there found the kit on Amazon, figured it was worth a shot. The kit arrived quickly, nicely packaged, clear instructions, and of course very useful to have a video for reference too. The only thing I did that was a little different to the instructions, was to tell the printer I was changing the ink in order to get the carriage in the place where the cartridges are accessible. Then I switched it off. I didn't want to risk cutting the power while it was trying to print, and although my method meant that the carriage was locked in place, I could still get the blotting paper under there no problem. Having left the fluid to soak for an hour, the result was excellent. I didn't have a perfect Test Pattern, but it was mostly unbroken, and easily good enough to get us printing again. However, a few weeks later I ran a second Test, and as you can see in the picture, it is in fact now perfectly unbroken (the other pattern is from before we tried the kit for comparison). So, I can't recommend this solution highly enough. Nice and simple, saves an old printer going to landfill, and saves us the money that we thought we were going to have to spend on a new printer.
J**B
Great product that works with some perseverance and great support from company
Never used a cleaning kit before. I chose this kit because it seemed better value than the others, coming with 150ml rather than 100ml of fluid. I'm sure they all use the same solution so it's really just a matter of cost. I had some old aquarium tubing and a syringe I was going to use, but glad I purchase the kit because the inner diameter of the hose is very small, which creates a tight fit on the printer nozzles. Anyway, if you're having minor issues with printing that isnt solved by the printers own cleaning cycle, then you may get a quick fix. However it took me about half a day in the end. I hadnt used the printer in a long while, and printhead had dried up. Im confident the actual cartridges were fine. Once I did a couple of flushes the Yellow, Black and Magenta were fine, but the Cyan still very weak. After a few more attempts I left the fluid in the print head over night as instructed, and then did a 1ml flush in the morning. Wasnt much improved, so I tried to forcefully blast a bit more liquid through each time. Then repeated the procedure as follows: 1) Clean print head with fluid, 2) Run printer cleaning cycle, 3) print test page, 4) print full solid Cyan colour page from Printhead Hospital website. Things were definitely improving but still not perfect so I decided to flush through a big load of liquid. Suddenly no cyan at all!!! So frustrating. So i started over again with the cycle. Cut a very long story short, after the initial clean, I dont think I ever had a problem with dried ink blockage. Ink was always flowing through onto the blotting paper when I did the flush. So what was causing my issue? I'm almost certain it was air. You have to be careful as you solve one problem you don't create another. As I was pumping lots of liquid through, and pumping it back and forth to clear the line, I trapped air inside. This will kill the printing dead. What you need then to do is flush through 1-2ml and as said in instructions, remove the syringe and replace the cartridge quickly. Why? Because as you remove the syringe, the fluid starts pouring back out the front. As it does this, air is getting sucked inside. I feel like you need to create a full system of liquid, almost a siphon. So you shove the cartridge back in quickly to trap that liquid in. Doesn't matter that you've got a line full of cleaning solution and ink. Eventually it will flush out. And sure enough, after a few more cleaning cycles, the colour got better and better and is now solved. Andy, the guy who runs the company was very very helpful. So nice to speak to someone these days. And great money back guarantee which I wont need now. He suggested going forward, that I make sure i leave the printer on at all times. Also, to replace ink as soon as it says "getting low" otherwise you risk entrapping air or drying out the head. Or switch over to an Ink Tank printer, that suffers less with this issue. Very very happy with Andy and the Printhead Hospital.
G**Y
It Worked - Eventually!
My Epson venerable WF3620 was getting a bit tired with some print dropout and streaky photos. Repeated head cleaning did not improve matters. I chose this kit a tad reluctantly given that the listing warned that irreparable damage can be caused to the printer in 0.01% of cases..... Anyway, it was a proper head clean or a new printer so I went ahead with the purchase. The first confusion was the differences in the instructions in the listing, those supplied with the kit (totally inadequate) and the excellent Google video tutorial. I chose to use the video method and, as suggested, 'unlocked' the print heads by unplugging the printer during a head cleaning cycle. I initially cleaned all 4 heads with the suggested 5 minutes (wait time between applications of fluid). Afterwards, I installed new cartridges and did a couple of head cleaning cycles. While things had improved, there were still some dropouts. So, I did it all again but with a 20 minute wait time. Alas, the printer then didn't recognise the cartridges at all! After powering off the printer and reinstalling the cartridges, everything burst into life and its like having a new printer! So, despite a few trials, the kit did work which makes it good value. However, patience is required. To be fair, everything you need is in the kit and there is sufficient fluid and blotting paper to allow multiple uses. The video did suggest using kitchen roll rather than the blotting paper. However, it is tricky getting sufficient kitchen roll positioned under the heads. Instead, I used 2 strips of the blotting paper. I used one initially then replaced it just before the second application of fluid. Despite my simultaneous cleaning of all 4 heads, this did the trick without undue mess. In the end, use of the kit is certainly cheaper and easier than getting and installing a new printer! Patience is a virtue....
K**R
Works exactly as described - a little patience and trust required
This is the first product review I have ever written but I am so impressed by this kit that it deserves feedback. I am very happy! I started the printer repair process this morning. I was really nervous! Then I reasoned that the printer is broken already so I could hardly make it worse. So armed with the provided solution, a mug of hot water and the syringe I did a 1hr incubation, tested with a nozzle check – it was even worse than before. Undeterred I repeated and did a 2hr incubation (according to instructions), reapplying hot solution and then leaving again for 2hrs before checking. I replaced with fresh ink cartridges. The original fault was missing segments in black and other colours fine – now I had nothing at all in black and missing segments in all other colours. I felt I was going backwards fast and began to think I was going to have to buy a new printer. I then went back to the instructions and ran a head cleaning protocol as suggested and, with little hope, checked the nozzles again. Miraculously they are all clear, crisp and I’m ready to go. I now feel richer by the value of a new printer and empowered by fixing it myself. I will be recommending to all my friends. The instructions are clear, it is nowhere near as complicated as I expected. I also envisaged ink all over but it is a remarkably clean process as long as you remember the blotting paper. The collection of run off on the blotting paper recreates secondary school science lessons - so as a bonus you get a free chromatography experience with this kit!
O**E
Worked eventually - Epson Stylus SX515W
Was having trouble with 2 blocked print heads (yellow and cyan) so decided to clean all of them using this product (even the black and magenta which were working ok). BIG MISTAKE!! Net result after first clean: NO working print heads, even after numerous printer self-cleans (as described in the instructions). Two further cleans with the product, over a dozen printer self-cleans and two complete sets of printer cartridges later and the printer is working nearly perfectly again. The product turned a mostly functioning printer into a non-functioning one and it took extreme patience and half a day's work to get it working again. I would have asked for the refund (which was readily offered via email) but ultimately the product did it's job, the print heads are now clean. Plus points: fast delivery, clear instructions and everything you need is provided in the kit.
S**W
Our printer is fully restored to working order!
Our Epson XP412 had been unable to print in colour for over a year, and even printing plain black text was hit and miss. I've been dithering over whether to try this kit, or just buy a new printer. I decided this was the better option, especially with the £10 refund if it didn't work. I've never tried any kind of hardware fix before, so I was really nervous to give this a go, but it was a lot simpler than I thought. I watched the tutorial video a couple of times. Seemed simple enough. The scariest part for me was having to switch off the power when the printhead was moving in order to release the lock, which the instructions said could damage the printer permanently. Since I had no other way to move the printhead, I told it to head-clean, as the video suggested, pulled the plug and hoped for the best. I was actually wasn't expecting much of a result on the first cleaning. The yellow was worst affected, so I injected 1ml, and left the syringe attached to it for about 15 minutes, then injected 1 ml more. I did the other 2 coloured heads, left them all to stand for about half an hour, replaced the blotting paper (I think I had a layer of kitchen towel folded up and sandwiched between 2 layers of blotting paper, so much ink came out), injected another ml into each, installed fresh cartridges, pushed the printhead back into place, and powered up. To my relief, the printhead seemed to be moving normally. However, the printer told me all 4 cartridges weren't recognised. Horror! But all it took was to take each cartridge out and put it back in. I got the usual lecture about non-Epson cartridges blah blah. Success! I ran a nozzle check and it was even worse than before. I followed the instructions to do a head clean, which sorted out the problem! I still have one blank spot on the black nozzle (I barely injected anything into the black, in case it made things worse), but the rest were perfect! I photocopied a brightly coloured item, and the colours were all there! Amazing! After the head being blocked for well over a year (probably two actually), and the printer only being used to print out black maybe once or twice a month at most, I really wasn't expecting the cleaning to work first time. I now have our pretty cool printer back! The important thing to remember about Epsons is to keep them active, so from now on I will be doing a nozzle check every couple of days or so to stop the ink drying and clogging up the printer again. The last best thing about this kit is you get SO MUCH of the cleaning fluid. If the printer does get clogged again, I know I have enough to clean it again and again and again and again...
D**N
Excellent Print-head Cleaner
I'm "House-sitting" at present and found my daughter's Epson printer wouldn't print black at all - even after going through 2 "clean nozzles" cycles and changing the cartridge. Did a Google search and found several products which can be used to clean print-heads, some with nice YouTube videos. The Printhead Hospital Product seemed good and good value. Read some of the Amazon reviews and decided to purchase a Kit. Ordered the Kit late one evening (First Class post), informed it had been dispatched during the next morning and it duly arrived the following morning - excellent service. The Kit is simple and the instructions clear to follow - and on a laminated card in case you spill ink on it! It includes a nice pair of good quality nitrile gloves. I warmed the bottle of solution as suggested. First you insert some blotting paper under the print carriage - warned by other reviewers, I cut a strip and folded it double! Then attached the flexible plastic tube to the 5ml syringe, drew up some warm fluid, removed the print cartridges and slipped the open end of the tube over the black print-head nozzle. At first, the syringe was EXTREMEMY stiff, but I didn't force it, just maintained steady pressure. After about a minute, the pressure eased slightly and I very slowly injected about 1/2ml. Left it to soak for 5 minutes. The next 2ml went in a little more easily, and eased further as I was injecting. As suggested in the instructions, I left it 1hr. The blotting paper was very wet and black by then, so I changed it. A further 2ml of warmed fluid then went in very easily. For good measure I put about 1ml through each of the 3 colour nozzles too. Then everything back together - DON'T FORGET TO REMOVE THE BLOTTING PAPER!! - with the brand-new black cartridge and .... PERFECTION!! Beautiful crisp clear black printing. IN SUMMARY : An excellent fix at a fraction of the price of a new printer or a commercial "repair"! Thanks Printhead Hospital and Amazon.
M**N
Resolved Epson R2880 Blockage
After not using my R2880 for a few months, 3 of the ink reservoirs became blocked. I tried the various recommended ways that Epson suggest to clear blockages but to no avail. Hence, I decided to give the Print Head Cleaning kit a try and I'm glad that I did. The blocked ink reservoirs and heads ranged in difficulty to clean. One of them cleared at the first attempt of using the kit. The worst one took three attempts and needed me to leave the solvent in place for an hour or so. However, once the final head was cleared, after a few test prints the printer was back to being as good a new. I actually used to kit to clear out all of the ink reservoirs and heads, so I hope that I will have trouble free operation for a while now. In terms of using the kit, you need to be careful not to inject too much solvent in at any one time. The blotting paper did a good job of absorbing the excess solvent and ink but I could see that a degree of care was required not to over fill each ink reservoir. Apart from that, the kit is easy to use and the results excellent.
I**P
Worked great
Two weeks ago, I bought a CISS from that well-known auction site that was prefilled with what the listing said was "sublimation ink." It turned out to be pigment dye ink. So now my printheads had residue ink from OEM epson claria ink and an unknown, possibly generic pigment dye. Putting the wrong type of ink into a printer and mixing inks is like putting regular gasoline into an 18-wheeler. It will need to be completely flushed out. I used the solution but not the direct injection method. Epson printheads tend to have a varying degree of sensitivity. Too much pressure through the printhead nozzles can destroy the interior seals in the printhead. Best thing to do is allow the printheads to clean themselves with the standard pressure it uses to print. I bought a set of empty 15 dollar cartridges along with this cleaner and filled them each with 8ml of the cleaning solution and 2ml of microwaved hot (CLEAN FILTERED) water. Some people like to put a few drops of black ink in the mixture but that is counter-productive to this method. Set your printer up to replace the ink cartridges. Once the cartridge cradle is in position, unplug your printer. Now make sure you have removed the airflow stickers from the cartridges that you are about to install. Place each cartridge in the cradle until they are secured and plug your printer in. It will now go into the long stage priming sequence. Some printers take a couple minutes, some take 5-10 but whatever the case, let it do it's thing. After the priming process, run a printhead-cleaning sequence. Be careful on running too many printhead-cleanings, that could re-clog or even ruin your printheads. Now wait about 7 or 8 hours and prime the system again (set printer to replace ink cartridges, wait for the cradle to get in position, un-plug the printer and remove each cartridge for about 5 seconds and replace, plug in printer and allow to prime.) Wait another 8 hours or so (doesn't have to be exact) and perform a printhead nozzle cleaning. After this second cleaning, you will perform a 3rd and final cartridge priming sequence. This time when you remove the cartridges, make sure to check them for cleaning solution. My black cartridge was at about 60%. Yellow, magenta, and light magenta were at about 10%. Cyan and light cyan were at about 30%. What this tells me is that the black nozzle was blocked up and my cyan nozzles were also dirty. Fill the cartridges with pure solution (they don't have to be full, I used 5ml in each cartridge with no water) and place them in the cradle, secure them, and plug your printer back in. Get the most color rich image you can find (Andy Warhol artwork is perfect for this) and make sure your printer settings are set on the best photo printing settings. Print copies of the image until the paper comes out almost blank (took 4 copies for my Epson 1400.) Now set your printer up to replace your ink cartridges. No need to un-plug this time, simply wait for the cradle to get into position, remove your cleaning cartridges, place your standard ink cartridges in the cradle and allow your printer to prime. You should have clear prints now. If not, try going through the process again and if the printhead pattern is still missing the same amount of areas, you probably need a new printer. Now this cleaning solution is top-notch. No funny color or smells, no gimmicky branding name for some windex and isopropyl alcohol mixture. If you plan on using the cleaning cartridges method, I recommend a clear, thin, and powerful solution such as this one.
S**Z
Get it! No need to buy a new printer after this!
It works every time!!! However, after using it a couple of times I wish there were more of those papers. I ended up using what I could find at home which is more absorbing, so I had to clean it up after use because it will leave a wet spot at the bottom. But the provided paper won't have that problem. Highly recommend this product because it works every time and I don't have to buy a new printer!
S**R
Worked well
As described
M**C
Nettoyage des buses
Voici un kit de nettoyage des buses de l'imprimante, comme on peut en avoir besoin pour un "gros" nettoyage. L'ensemble des accessoires de ce kit est bien calculé et le travail lui-même est très simple. J'attends de voir quels sont les résultats après le séchage, mais tout a l'air correct
M**.
Einfach anzuwenden. Ergebnis top!
Ich schreibe nicht viele Bewertungen, aber hier ist es mir ein Bedürfnis. Ich hatte meinen Epson WF-7720 schon fast aufgegeben. Der Drucker ist noch kein Jahr alt. Da ich aber zwei von der Sorte habe, wurde er nicht sehr oft gebraucht und der magentafarbene Druckkopf ist eingetrocknet. Auch mehrfache versuche mit der druckereigenen Druckkopfreinigung brachten keinen Erfolg. Als letzten Ausweg habe ich mir das Düsenreinigerset bestellt. Nach der ersten Anwendung, die wirklich kinderleicht war, wurde es sogar noch schlimmer. Ein Düsentest ergab, dass überhaupt kein Magenta mehr gedruckt wurde. Ich habe die Anwendung wiederholt und der Düsentest war katastrophal, da keine Farbe mehr richtig gedruckt wurde. Danach hatte ich den Drucker schon aufgegeben, aber trotzdem noch eine Druckkopfreinigung aller Farben angestoßen. Da ich doch immer noch Hoffnung hatte, habe ich am nächsten Tag den Ausdruck der Druckkopfreinigung angestoßen und siehe da - ein perfektes Druckbild!!!!! Also, sollte Euer Drucker die gleichen Probleme haben, probiert es einfach aus und habt ein bisschen Geduld. Ich konnte mit ein paar Euro Einsatz meinen Drucker wieder zum Laufen bringen. Dabei habe ich nur wenige ml davon gebraucht.
Trustpilot
4 days ago
2 days ago